Scrappy Saturday - 7/16/11
This was a little scrappy experiment to see if I could use a coffee filter as a base/stabilizer for a Drunkard’s Path block –
I started with a little square in the middle of the coffee filter -
And some scrappy string/strips -
And sewed a couple of rounds – log-cabin style – clockwise -
Then a couple of more rounds -
Turn it over to make sure I didn’t miss a spot -
Pin it to a square of muslin -
Right side down -
Stitch around it -
Trim it – 1/4" all around -
Tear off the coffee filter paper -
Make a slit in the muslin –
Turn it right side out -
Looks a little lumpy around the edges to me -
So I dig out my handy-dandy pinking shears -
Remember those?
These are so old – you can’t see in the photo – but the price sticker is still visible - $3.47 –
Yeah – those suckers are OLD!!
(And before you ask - yeah - they're right-handed - making them a real pain to have to use!)
Turn it back inside-out -
Pink the edges all around -
Turn it right side out – again -
Doesn't look as lumpy this time - much better -
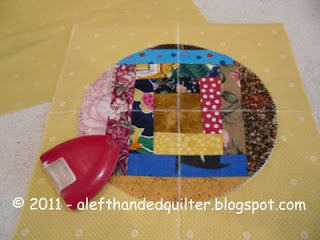
Pin the circle to a yellow background square (I LIKE YELLOW!)
And blanket stitch it all around -
Then – because I thought I was being clever -
I drew a chalk line through the middle of the circle -
Horizontally and vertically - (a little crooked - 'cuz they didn't come out the SAME size!)
Then I basted (long stitch) - 1/4" to the left and the right of both lines -
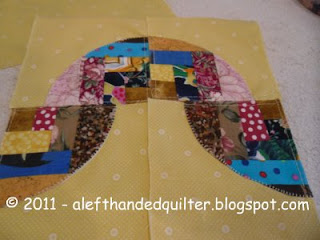
I cut down the center – between the seam lines -
MAGIC!! –
I have 4 Drunkard’s Path blocks – all with the edges already basted –
Clever, huh? Yeah, I thought so!
So I played with them a bit – re-arranging them this way and that -
I kinda like the circle – you know – just mixed up - for a little table topper –
So – I sewed them back together –
And pressed the seams open trying to reduce the bulk
Then pressed the other seam open
Nah – this sucker is REALLY thick in the middle -
My “clever” trick wasn’t so clever after all!!
So I cut both seams out
Then I trimmed out the excess layers
And layered all four with batting – for coasters
I tried the first one - "envelope" style
It came out way too small for a coaster -
See it next to the little bitty (3 oz.) candle –
So I quilted the other three - and pulled some strips out for binding
You can see the last one I made on the left -
Much bigger – huh?
The smaller one lost 1/2" in size because the seam allowances were on the “inside”
All done –
Four coasters – or “Mug Rugs” as they are now called –
Not exactly the same size –'cuz I didn't pay attention when I cut them -
But they are going to be scattered around my room -
So – it works for me!
Talk to you later – gotta go – gotta sew -
A blog about quilting and using the LEFT-EZE Rule - my HST/QST Ruler designed for LEFT-HANDED Quilters -
Pages
- Home
- LEFT-EZE™ Rule
- LEFT-EZE™ Rule - Tutorials
- LEFT-EZE™ Rule - Size Chart
- LEFT-EZE™ Rule - Free Pattern & Tutorial
- LEFT-EZE™ Rule - Reviews/Testimonials
- About This Blog - And Me
- Rules
- Reviews
- Quilt Journal
- QJ - Floral Applique
- Sudoku Quilts
- Studio Organization
- Fabric Storage Tips
- Left-Handed Quilting (LHQ) - Introduction
- LHQ - Basics
- LHQ - Rotary Cutting
- LHQ - Construction
- LHQ - Hand Sewing
- LHQ - Binding
- LHQ - Finishing The Quilt
- LHQSQ - LHQ Sampler Quilt
- UFOs/Projects/Squirrels
- Quilt-Along - LHQSQ 2.0
- Privacy Policy


5 comments:
I love the coasters.....and really enjoyed seeing the process it took to get there. Gotta love pinking shears....I have two pairs....The Missus gave me her mum's and I have another pair...both right handed.....The company that makes those lil instruments of torture for lefties will make a fortune! Hhhmmm...maybe we should start harrassing the manufacturers!
You are so very clever. I'm leaving now to go back to one of your earlier posts about using decorative stitches to bind. Please pray for me.
Now that is just genius! My pinking shears are so old they weigh a ton and don't work.
I really like those! What a great idea. And now to be perfectly honest, I'd never have thought to do drunkard's path using a round applique and cutting - you're so smart!!!
Thanks, everybody! I'm glad you like the idea of appliqueing a circle to a square and then cutting it into quarters to make four Drunkard's Path blocks. That trick has been around FOREVER! I have no idea who came up with it - but it wasn't me!
My experiment was to see if a ROUND coffee filter could be used as a base for the CIRCLE applique part of the block.
^..^
Post a Comment